Hiking Trail to Half Dome
Explore the hiking trail to Half Dome's summit in Yosemite National Park. Learn about the route, the cables, permits, and tips for making the climb. Visit this page to plan your ultimate Yosemite hike.
Publish Date: April 6, 2025
Revision Date: April 6, 2025
Yosemite National Park Visitor's Guide is a Trademark.
Copyright © 2025 by Internetpress®
Hiking Half Dome
Hiking Half Dome is a journey that demands serious planning, preparation, and respect for the trail’s challenges. In this section, we’ve gathered essential details and unique insights you won’t find on the National Park Service website or most other sources, making it one of the most comprehensive resources for reaching the Half Dome summit. However, even with this guide, remember that the trail can be dangerous without physical fitness and preparation. Be sure to read our “Safety and Advice” section to understand the risks and how to prepare properly.
Here, you’ll find everything from permit requirements and seasonal trail openings to where the trailhead is, how to get there, parking options, public transit, trail restrictions, estimated hiking times, restroom locations, and tips for checking weather forecasts. We've also included maps to help guide you along the way. While we’ve made every effort to provide the information you need, we can’t guarantee that every detail is covered—conditions change, and every hiker’s experience is unique. Use this section as a key part of your planning toolkit, and get ready for a memorable adventure to Half Dome!
Is a Permit Required to Hike Half Dome?
Since 2010, a permit system has been in place to manage the number of hikers on the Half Dome trail, specifically on the cables section. Permits are required seven days a week when the cables are up. The permit system is designed to preserve the natural environment and enhance safety by limiting the number of hikers to 300 per day: 225 day hikers and 75 backpackers. Permits can be obtained through a preseason lottery held in March and a daily lottery during the hiking season.
These seasonal considerations and the permit system help ensure a safer and more enjoyable experience for those attempting the challenging and rewarding hike to the summit of Half Dome.
How much does the Half Dome Hike Permit Cost?
As of the most recent information, the cost for a permit to hike Half Dome is typically around $10 per person for a day-use permit, with an additional application fee of $10 per application, regardless of the number of people listed. The fees help manage the permit system and maintain the trail and cables. It's always a good idea to check the official Yosemite National Park website or contact the park directly for the most current permit prices and any updates to the process.
How to Purchase a Permit to Hike Half Dome
Permits to hike Half Dome are obtained through a lottery system managed by the National Park Service. There are two types of lotteries:
Preseason Lottery
- Held in March, this lottery distributes most of the permits for the hiking season.
- Applications are submitted online at recreation.gov.
Daily Lottery
- For those who missed the preseason lottery or were not selected, a limited number of permits are available through a daily lottery during the hiking season.
- Applications must be submitted two days in advance of the desired hiking date through the recreation.gov website or mobile app.
For both lotteries, you'll need to create an account on "recreation.gov" and follow the application instructions. The website provides detailed information on the application process, deadlines, and notification of results. It's crucial to plan ahead and apply early, especially for peak season dates.
When is the Half Dome Trail Open?
The trail to Half Dome is typically open from late May to early October, depending on weather conditions and snowmelt. The cables, which are essential for the final ascent, are installed by the National Park Service during this period and are usually removed for the winter season around mid-October.
Spring
In late May or early June, when the cables are first installed, the trail can still have significant snow and ice, particularly in higher elevations. Hikers during this time should be prepared for potentially slippery conditions and cold weather, especially in the early morning or late evening. The rivers and waterfalls along the Mist Trail, including Vernal and Nevada Falls, are usually at their peak flow due to snowmelt, adding both beauty and hazard to the hike.
Summer
The trail is most accessible and popular during the summer months from June through September. The weather is generally warm, with daytime temperatures often reaching the 70s and 80s Fahrenheit (20s Celsius). However, summer also brings larger crowds, and securing a permit through the lottery system becomes more competitive. Thunderstorms are common in the afternoons, so hikers are advised to start early to avoid lightning risks.
Fall
Early October can be an excellent time to hike Half Dome, as the crowds thin out and the temperatures cool. The cables remain in place until mid-October, provided the weather remains stable. However, early winter storms can occasionally force an earlier removal of the cables, so hikers should check current conditions and forecasts.
How Much Strength is Needed to Hike Half Dome?
Hiking to the summit of Half Dome requires considerable physical strength and stamina, as the trail poses various challenges at different sections.
The initial ascent up the Mist Trail demands strong legs and endurance to climb the steep granite steps alongside Vernal and Nevada Falls. These sections are often wet and slippery, requiring good balance and careful footing. A raincoat will protect you from the mist created by the falls.
As the trail continues, hikers need sustained cardiovascular strength to manage the long, uphill trek along the John Muir Trail, which offers a brief respite from the steep inclines but requires ongoing energy and determination.
Reaching the Sub Dome, hikers face a physically demanding climb, needing strong legs and a steady core to navigate the exposed switchbacks. The final push up the Half Dome cables tests upper body strength, grip, and mental fortitude, as hikers pull themselves up the nearly vertical granite face.
Throughout the hike, core stability and overall fitness are crucial for maintaining balance and reducing fatigue, making this journey a true test of physical strength and endurance.
How long is the Hike to Half Dome?
The journey to the summit of Half Dome is a true testament to the adventurous spirit, set against the backdrop of Yosemite's unparalleled natural beauty. From any of the three parking lots, which are conveniently located within 4,110 feet (1.25 km) of the trailhead, the expedition stretches over a round trip of approximately 13.3 miles (21.2 km). As you traverse the 6.6 miles (10.6 km) to the peak, you’ll ascend a challenging 4,800 feet (1,463 meters) in elevation, each step bringing you closer to the iconic summit.
Typically, this strenuous hike demands 10 to 14 hours of perseverance, with the duration varying based on your pace, physical fitness, and the day’s trail conditions. The ascent is not just a physical challenge but a journey through some of the most breathtaking scenery in Yosemite. The climb, especially the famed final stretch up the cables, requires stamina and nerve, but the reward is unparalleled: panoramic views from the top that capture the majesty of Yosemite and a profound sense of personal accomplishment.
Due to the length and demanding nature of the hike, an early morning start is essential. This ensures ample time for both the climb and descent, allowing you to fully immerse in the summit experience without rushing, making the entire adventure not just a hike, but a memorable expedition into the heart of one of America’s most storied national parks.
How to Prepare for the Half Dome Hike
When preparing for the hike to Half Dome, it is crucial to equip yourself with appropriate clothing, footwear, gear, and food. Proper preparation enhances your safety and comfort, making the challenging hike more enjoyable.
Clothing
- Wearing moisture-wicking, breathable clothing is essential. Opt for layers to accommodate changing weather conditions.
- A moisture-wicking base layer, such as a thin polypropylene undershirt being a fabric of first choice followed by polyester, helps keep sweat off your skin, while an outer insulating layer, such as wool or a fleece, made of polypropylene or polyester, provides warmth during cooler parts of the hike, with wool being the recommended fabric.
- A waterproof and windproof outer layer, like a lightweight jacket, is vital in case of rain or strong winds. Don't forget a hat and sunglasses to protect against the sun's intense rays at higher elevations.
- Avoid using cottton as a fabric for any clothing.
Footwear
- There are at least three points of view here. The first one is of hiking boots with good ankle support. The second one is of hiking shoes, and the third is of using lightweight athletic shoes, such as sneakers. Whatever choice you make, assure that they are well-fitting and must provide a solid grip for the Half Dome hike, and that you understand their different capabilities.
- The terrain is rugged and includes steep, rocky, and smooth sections, particularly on the Mist Trail and the final ascent via the cables. Ensure your boots are broken in before the hike to avoid blisters and discomfort. When the surface is wet on the Half Dome cables segment, it is slippery and dangerous.
- Consider wearing moisture-wicking socks. Better yet, wear a thin sock made polypropylene or polyester under a thin wool sock, because that combination will also mitigate blisters. Carry an extra pair to change into if needed. Avoid wearing socks made of cotton.
Hand Gloves
Many people find it very helpful to wear sturdy gloves that have a very good grip on the cables. However, if you bring your gloves, pack them out. Hundreds of pounds of rotting gloves otherwise accumulate.
Equipment
- Essential equipment includes a comfortable and supportive backpack to carry your supplies. Pack plenty of water—at least 3 to 4 quarts (about 3 to 4 liters) per person—as dehydration is a significant risk, especially in the summer. A water filtration system or purification tablets can be useful for refilling from streams.
- Bring high-energy snacks and a full meal for the long hike, as well as a first aid kit, headlamp or flashlight with extra batteries, a map, and a multi-tool or knife.
- A compass or GPS device is typically not needed, because the trails are well marked and many people will typically be joining you. Such devices are needed when trails are not visible and unmarked, which is not the case on the trail to Half Dome. It’s your decision.
- Trekking poles can provide additional support and stability, particularly on steep and uneven sections. The park requires that poles used on the Half Dome Trail have rubber tips or rubber feet. Poles with uncovered carbide tips are prohibited on the dome.
Safety and Advice
These recommendations are meant to help you prepare, but the hiker is ultimately responsible for their safety. Before embarking on the hike, seek advice from a park ranger or a professional guide, especially if you are unfamiliar with the area or the challenges of the hike. Check the weather forecast, trail conditions, and ensure you have the required permits. Your safety is paramount, so always err on the side of caution and be prepared to turn back if conditions become unsafe.
By following these recommendations and obtaining professional advice, you can better ensure a safe and enjoyable hike to Half Dome.
References
The National Park Service has a page that is dedicated to the Half Dome hike, and it has a little more information, such as conditions, but not actual weather conditions.
The U.S. National Weather Service publishes a daily weather forecast and current weather conditions. To see the conditions and forecast in Yosemite Valley, use this link.
Use this other link for the National Weather Service's forecast and conditions at the summit of Half Dome.
Where is the Half Dome Trailhead Located?
Yosemite is a vast wilderness brimming with interconnected trails, each marked by its own distinctive name, making each path a unique adventure. Notably, the journey to Half Dome doesn't begin on a single, linear trail; instead, it's a weaving path through the eastern end of Yosemite Valley, where towering domes rise, including the majestic Half Dome itself.
Your trek starts at the Happy Isles area, nestled at the base of Half Dome. Here, where the Happy Isles Loop Road meanders alongside the Merced River, you’ll find the trailhead just about 200 feet (61 meters) east of where the Happy Isles Bridge crosses the river. It's officially named the "Mist Trail and John Muir Trail Trailhead" — a bit of a mouthful because it marks the convergence of two significant trails.
The Mist Trail embarks from this point, carving a route that extends beyond Vernal Falls and stops just short of the Silver Apron Footbridge over the Merced. Meanwhile, the John Muir Trail stretches out from this junction, winding through the Yosemite wilderness. The specific path to Half Dome itself picks up about 4.6 miles (7.4 km) deeper into this wilderness expanse.
This section sets the stage for your ascent, described later in the "Trail to Half Dome" section, which guides you through one of Yosemite’s most storied expeditions.
What is Happy Isles?
Happy Isles is a scenic area located in the eastern end of Yosemite Valley, known for its picturesque setting and accessibility to popular hiking trails. It consists of a pair of small islands in the Merced River, which are connected by bridges and surrounded by lush vegetation. The area features easy walking paths, making it a great spot for families and those looking to enjoy a leisurely stroll while experiencing Yosemite's natural beauty.
Facilities at Happy Isles
Happy Isles Nature Center
- Offers educational exhibits about the park’s natural history and geology.
- Provides information on local flora and fauna, making it an excellent stop for families and nature enthusiasts.
Restrooms (Toilets)
Public restrooms are available at Happy Isles, ensuring convenience for all visitors
Picnic Areas
Designated picnic spots with tables and benches are available, providing a perfect place for a meal amidst nature.
Trailheads
- Happy Isles serves as the starting point for several major hiking trails, including the Mist Trail and John Muir Trail.
- Information boards and maps are available to help hikers plan their routes.
These facilities ensure that whether visitors arrive by shuttle, bike, foot, or car, they have the amenities they need to enjoy their visit to Happy Isles and embark on their adventures in Yosemite National Park.
How to Get to Happy Isles while in Yosemite Valley
If already a visitor in Yosemite Valley, you can reach Happy Isles using several methods, each supported by various facilities to accommodate their needs:
Methods for Getting to Happy Isles
By Shuttle Bus
Yosemite operates a free shuttle service that runs throughout the valley. Shuttle stops are conveniently located near major lodging, camping, and picnic areas. Shuttles run frequently, especially during peak seasons, and have stops at popular locations such as Yosemite Village, Curry Village, and Yosemite Lodge at the Yosemite Falls. The Happy Isles stop is along the eastern end of the shuttle route, making it easily accessible without the need for a personal vehicle.
Here is the link to the shuttle bus page at the National Park Service. It provides online maps, schedules, and route information.
By Bicycle
Biking is a popular and eco-friendly way to get around Yosemite Valley. The park has dedicated bike paths that lead to Happy Isles. Bike rentals are available at Curry Village and Yosemite Lodge at the Yosemite Falls. Bike racks are provided at Happy Isles, allowing visitors to securely park their bicycles while exploring the area on foot.
By Foot
Walking is another excellent way to reach Happy Isles, especially for those staying in nearby campgrounds or lodging facilities. Paved walking paths connect various parts of the valley, providing a scenic and direct route to Happy Isles.
By Personal Vehicle
While personal vehicles are permitted, parking can be limited, especially during peak tourist seasons. The closest parking areas to Happy Isles are the Yosemite Valley Trailhead Parking Lot followed by the Curry Village Parking Lot, from which visitors can walk or take the shuttle to Happy Isle.
Where are the Parking Lots at the Half Dome Trailhead?
There are three parking lots, and all are free use. The Yosemite Valley Trailhead parking lot is about 2,700 feet (823 meter) from the trailhead, the North Pines Campground lot is about 3,737 feet (1.14 km) from the trailhead, and the Curry Village parking lot is about 4,110 feet (1.25 km) from the trailhead. Keep in mind that the North Pines lot is sometimes restricted to vehicles which are towing horses to the North Pines Stables. These lots are the best and closest lots to the trailhead.
The following map shows the path from the North Pines parking lot entering the Merced River. That is not true. In reality, the path remains on land, and along the Valley Loop Trail that follows the river’s shoreline.
From the Park’s Entrance, How Far is it to the Half Dome Trailhead Parking Lots?
Arriving at Yosemite National Park through any of its four main entrances is the first step on your adventure to Half Dome. Each entrance, located on the park’s western, southwestern, southern, and eastern borders, offers its own unique gateway into this majestic landscape, setting the stage for an unforgettable hiking experience.
Once inside the park, you have three parking lot options for the Half Dome trailhead—all free to use and conveniently close to the start of your hike. The nearest is the Yosemite Valley Trailhead Parking Lot, situated approximately 2,700 feet (823 meters) from the trailhead. The North Pines Campground lot is a bit further, about 3,737 feet (1.14 km) away, and it's worth noting that this lot may be limited to vehicles with horse trailers for the North Pines Stables. Lastly, the Curry Village Parking Lot is around 4,110 feet (1.25 km) from the trailhead. These are the best spots for easy access to the beginning of your journey.
As for the park entrances themselves:
- Big Oak Flat Entrance: Located on State Route 120 (SR 120) on the western side, this entrance welcomes you with a gradual introduction to the park’s sprawling landscapes.
- Arch Rock Entrance: Situated on State Route 140 (SR 140) to the southwest, this dramatic entry features a drive through a massive rock arch, offering a memorable start to your visit.
- South Park Entrance: Found on State Route 41 (SR 41) on the southern side, it provides a direct route deep into the heart of Yosemite.
- Tioga Pass Entrance: On the eastern end of SR 120, this entrance might be the most scenic, presenting breathtaking high-altitude views as you enter.
Equipped with this information, you can feel well-prepared to navigate through the park and find the perfect starting point for your trek to Half Dome, ensuring that your adventure begins smoothly and memorably right from the park gates.
| Entrance Location | Entrance Name | Approximate Distance to Yosemite Valley Trailhead Parking Lot | Approximate Automobile Travel Time |
|---|---|---|---|
| Western on SR 120 | Big Oak Flat | 25.2 miles (40.6 km) | 49 minutes |
| Southwestern on SR 140 | Arch Rock | 12.6 miles (20.3 km) | 25 minutes |
| Southern on SR 41 | South Park | 32.4 miles (52.1 km) | 58 minutes |
| Eastern on SR 120 | Tioga Pass | 64.0 miles (103 km) | 1 hour 41 minutes |
Trail to Half Dome
Embarking on the iconic ascent to Half Dome is a journey that begins amidst the serene surroundings of Yosemite's valley floor. For many, the 7 mile (11.3 km) trek starts at one of three main parking lots: the Yosemite Valley Trailhead Parking Lot, the North Pines Campground Parking Lot, and the Curry Village Parking Lot. Each of these starting points offers a unique pathway leading toward the wilderness. It's worth noting that the North Pines lot may be reserved for vehicles with horse trailers, as it's near the stables.
From any of these lots, you can connect to the trailhead at Happy Isles Bridge via the free Valley Shuttle Bus, stopping at “Happy Isles, Stop 16.” The Yosemite Valley and Curry Village parking lots are conveniently located along the Valley Loop Trail, which guides you directly to the trailhead. For those starting at North Pines, an unmarked trail across from the lot entrance will lead you to the same loop.
The hike truly begins at the trailhead where the paths of the "Mist Trail and John Muir Trail" converge. After following these joined trails for about 1 mile (1.6 km), they diverge, and you will continue along the Mist Trail for another 1.2 miles (1.9 km) until it meets back with the Muir Trail. From this junction, the Muir Trail winds through the park for about 2.4 miles (3.7 km) before reaching a critical split. Here, one trail continues as the John Muir Trail, venturing further into the Yosemite wilderness, while the other ascends towards Half Dome.
Choosing the path to Half Dome, you'll face approximately 1.9 more miles (3.1 km) to the summit. This final stretch embodies the spirit of adventure in Yosemite’s stunning backdrop, promising unforgettable memories and a profound sense of accomplishment as you reach the peak. This trek is not just a hike; it's an expedition through one of America's most beloved national parks, culminating in a breathtaking panorama that rewards your efforts with awe-inspiring views over Yosemite.
Where are the Toilets along the Trail to Half Dome?
As you embark on the trail to Half Dome, you won't just encounter stunning views and challenging climbs—there are also plenty of rest stops for when nature calls, strategically placed to ensure your comfort along this majestic trek. There are five toilets along the trail.
The first comfort station is right at the trail's start near the Happy Isles Bridge, aptly named the Happy Isles Restroom. It’s a perfect spot for those last-minute decisions before the real hiking begins. A mile (1.6 km) up the trail, as you near Vernal Falls, you'll find the second restroom. It's conveniently located for a quick pit stop amidst the misty air of the falls.
Continue your ascent, and about 3,000 feet (914 meters) later, just before the Silver Apron Footbridge, the Emerald Pool Restroom awaits. This spot is a favorite for a quick pause before the trail gets steeper. The fourth facility, the Nevada Falls Composting Toilet, is located just past Nevada Falls, another 4,200 feet (1,280 meters) up—ideal for a break after enjoying the breathtaking views at the falls.
For those detouring towards Little Yosemite Valley, a fifth restroom—the Little Yosemite Valley Vault Toilet—is just off the main trail, about 1.2 miles (1.9 km) away from the trailhead, and very near the Little Yosemite Valley campground. This little detour is a small adventure in itself, nestled about 200 feet (61 meters) from the John Muir Trail.
From this last outpost, you're only 2.8 miles (4.5 km) from the sub-dome and 3.1 miles (5 km) from the summit of Half Dome. So, laugh a little at the quirky joys of outdoor plumbing as you make your way up, knowing that each restroom not only offers relief but marks a significant milestone on your path to the peak!
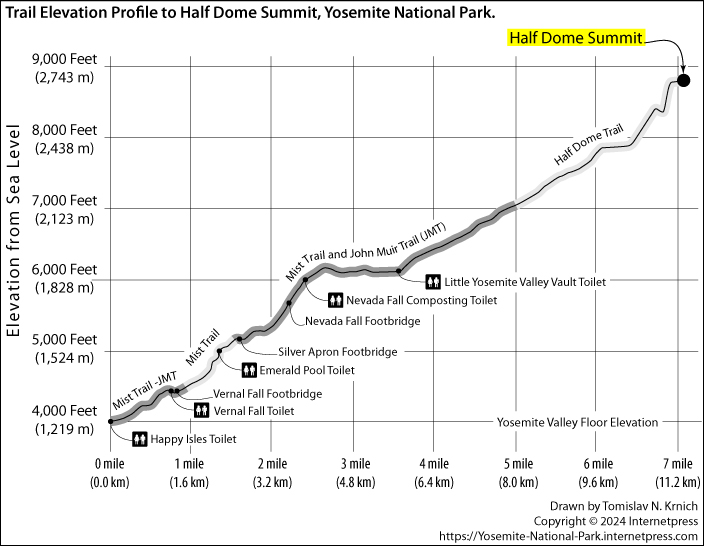
All the toilets are shown by Map 6, "Trail to Half Dome" and Figure 17, "Trail Elevation Profile to Half Dome."
Equipment and Activities which are Not Permitted
When planning your hike to Half Dome, it is important to know which equipment and activities are not permitted to ensure your compliance with park regulations.
Equipment Restrictions
Certain equipment is not allowed on the hike to Half Dome to maintain safety and preserve the natural environment. Drones, for instance, are prohibited in Yosemite National Park to protect wildlife and maintain the tranquility of the park. Similarly, firearms (the law about firearms may have changed) and other weapons are not permitted on the trail. While trekking poles are allowed and often recommended, ensure they have rubber tips to prevent damage to the granite surfaces and trails.
Bicycles are not allowed on hiking trails, including the Half Dome trail, to avoid accidents and preserve the hiking experience for others. Motorized vehicles and scooters are also prohibited. For the final ascent up the cables, gloves are recommended but not required; however, bringing gloves with a good grip can help with safety and comfort on the cables.
Activity Restrictions
Several activities are restricted to ensure the safety of all hikers and the preservation of the park. Camping is not allowed on the Half Dome trail itself. Overnight camping is only permitted in designated wilderness areas with an appropriate permit. Additionally, campfires are not permitted along the trail or at the summit of Half Dome due to fire risk and environmental concerns.
Pets are not allowed on the trail to Half Dome, as the steep and rugged terrain can be dangerous for animals and they can disturb the local wildlife. Swimming in the rivers and streams along the trail, particularly in areas near waterfalls like Vernal and Nevada Falls, is also prohibited due to strong currents and hazardous conditions.
Permits and Regulations
Remember, hiking to Half Dome requires a permit, especially for the section involving the cables. This permit system is in place to limit the number of hikers and reduce environmental impact. Climbing the cables without a permit is illegal and can result in fines.
Lastly, engaging in any commercial activities, such as guiding services or filming for profit, requires special permits and is not allowed without prior authorization from the park authorities.
Conclusion
By adhering to these equipment and activity restrictions, you help protect the natural beauty of Yosemite National Park and ensure a safer, more enjoyable experience for all visitors. Always check the latest regulations and guidelines from the National Park Service before your hike to stay informed and compliant.
Weather Conditions and Forecast at Half Dome
The U.S. National Weather Service publishes a daily weather forecast and current weather conditions. To see the conditions and forecast in Yosemite Valley, use this link.
Use this other link for the National Weather Service's forecast and conditions at the summit of Half Dome.
Lodging and Camping
This section will be published at a later date. To get notified, subscribe to the news letter.